Model Configurations
Voice Agents need AI Models to work, like LLM (Large Language Model), TTS (Voice) and STT (Transcriber). You can use any of your faviourite providers with Paladin Platform to run your Voice Agent.
How Model Configuration Works#
Paladin uses a two-level configuration system for AI models:
- Global configuration — A single set of model settings (LLM, TTS, STT) that applies to all agents by default.
- Agent-level overrides — Optional per-agent settings that override the global configuration for specific services.
If no overrides are set for an agent, it uses the global configuration as-is.
Global Configuration#
The global configuration is the default model setup shared throughout all your agents. Paladin ships with its own models by default. When your workspace is provisioned, you receive model credits to start with.
To configure the global models, go to Model Configurations in your dashboard: Open Model Configurations in your Paladin dashboard.
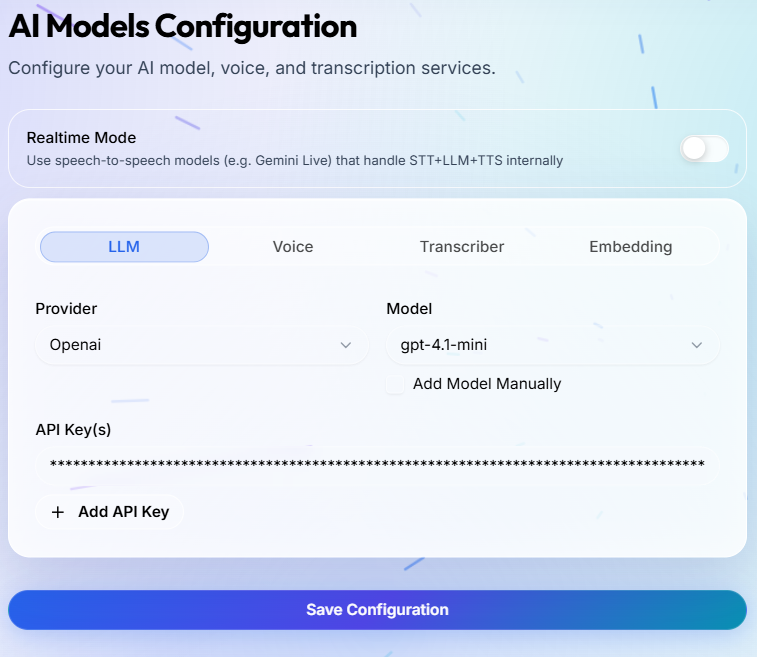
From here you can configure each service:
| Service | What it does |
|---|---|
| LLM | The language model that generates responses (e.g., OpenAI GPT-4.1, Anthropic Claude) |
| TTS (Voice) | The text-to-speech model that converts responses to spoken audio (e.g., ElevenLabs, Cartesia) |
| STT (Transcriber) | The speech-to-text model that transcribes user speech (e.g., Deepgram, AssemblyAI) |
| Realtime | A single speech-to-speech model that handles LLM, TTS, and STT in one (e.g., Gemini Live) |
Select a provider from the dropdown and configure the API key, model, and any provider-specific settings. For Paladin's own models, see Service Keys for instructions on creating Service Keys.
Agent-Level Model Overrides#
You can override the global model configuration for any individual agent. This is useful when different agents have different requirements — for example, a customer support agent might use a faster, cheaper LLM while a sales agent uses a more capable one.
Configuring overrides#
- Open the agent you want to customize.
- Go to Settings in the agent detail page.
- Select the Model Overrides tab.
- You will see tabs for each service: LLM, Voice (TTS), and Transcriber (STT).
- Toggle Override on for the service you want to change.
- Configure the provider, model, and other settings as needed.
- Save your changes.
Selective overrides#
Each service can be toggled independently. When an override is off for a service, the agent inherits the global setting for that service. When an override is on, the agent uses the override setting instead.
| LLM Override | TTS Override | STT Override | Result |
|---|---|---|---|
| Off | Off | Off | Agent uses global config for all services |
| On | Off | Off | Agent uses custom LLM, global TTS and STT |
| Off | On | Off | Agent uses global LLM and STT, custom TTS |
| On | On | On | Agent uses custom config for all services |
For example, if you only want to change the voice for a specific agent:
- Leave the LLM and Transcriber overrides off.
- Toggle the Voice override on.
- Select a different TTS provider or voice.
- The agent will use your custom voice while still using the global LLM and STT.
Realtime mode override#
You can also switch an individual agent to use a Realtime provider (such as Gemini Live) even if the global configuration uses standard LLM + TTS + STT. Toggle the Realtime switch in the Model Overrides tab, then configure the realtime provider, model, and voice.
Gemini 3.1 Live#
Gemini 3.1 Live is Google's realtime multimodal API that handles both LLM and voice in a single model. Instead of configuring separate LLM, TTS, and STT services, Gemini Live acts as an all-in-one realtime provider — it processes speech input, generates a response, and speaks it back, all over a single streaming connection.
Paladin supports Gemini 3.1 Live as a Realtime provider. The default model is gemini-3.1-flash-live-preview.
Available Voices#
You can choose from the following built-in voices:
| Voice | Description |
|---|---|
| Puck | Default voice |
| Charon | — |
| Kore | — |
| Fenrir | — |
| Aoede | — |
Getting a Gemini API Key#
To use Gemini 3.1 Live with Paladin, you need a Google Gemini API key. Follow these steps:
- Go to Google AI Studio.
- Sign in with your Google account.
- Click on Get API Key in the left sidebar.
- Click Create API Key.
- Select an existing Google Cloud project or create a new one.
- Copy the generated API key and store it securely.
Configuring Gemini 3.1 Live in Paladin#
- Go to Model Configurations in your Paladin dashboard (
https://app.paladin.northmanngrp.com/configurations/inference-providershttps://app.paladin.northmanngrp.com/model-configurations). - Under the Realtime section, select
google_realtimeas the provider. - Paste your Gemini API key.
- Select the model (
gemini-3.1-flash-live-previewis available by default, or you can enter a model name manually). - Choose a voice from the dropdown (default is
Puck). - Select the language (currently
enis supported).
Gemini Live on Vertex AI#
If you want to run Gemini Live through your own Google Cloud project — for billing consolidation, VPC controls, regional residency, or enterprise IAM — Paladin also supports Gemini Live via Vertex AI as a separate provider (google_vertex_realtime). The default model is google/gemini-live-2.5-flash-native-audio.
Unlike Google AI Studio (which uses a single Gemini API key), Vertex AI authenticates with a service account belonging to your Google Cloud project.
Prerequisites#
- A Google Cloud project with billing enabled.
- The Vertex AI API enabled on that project:
gcloud services enable aiplatform.googleapis.com --project=YOUR_PROJECT_ID- A service account with the Vertex AI User role (
roles/aiplatform.user) on the project:
   gcloud projects add-iam-policy-binding YOUR_PROJECT_ID \
     --member="serviceAccount:YOUR_SA@YOUR_PROJECT_ID.iam.gserviceaccount.com" \
--role="roles/aiplatform.user"- A JSON key for that service account (P12 keys are not supported).
Creating the service account key#
- In the GCP Console, go to IAM & Admin → Service Accounts.
- Pick an existing service account (or create a new one).
- Open the Keys tab → Add Key → Create new key.
- Choose JSON as the key type and click Create.
- The key file will download to your computer — store it securely and treat it as a secret.
Configuring Vertex AI Realtime in Paladin#
- Go to Model Configurations in your Paladin dashboard.
- Enable the Realtime toggle.
- Under the Realtime section, select
google_vertex_realtimeas the provider. - Fill in the fields:
| Field | What to put in |
|---|---|
| Model | Vertex publisher/model id, e.g. google/gemini-live-2.5-flash-native-audio |
| Voice | One of the built-in voices (Puck, Charon, Kore, Fenrir, Aoede) |
| Language | BCP-47 code (e.g. en-US) |
| Project Id | The project_id value from your service-account JSON |
| Location | GCP region where the model is available (e.g. us-east4) |
| Credentials | Paste the entire contents of the service-account JSON file |
| API Key | Leave blank — Vertex AI does not use API keys |
- Save the configuration.