Add to Website
Add your Paladin voice agent to any website so visitors can talk to it.
How to add it#
Add your voice agent to any website using the Configure Widget dialog in your agent's settings.
Step 1: Open the agent settings by clicking the gear icon in the top-right of the agent editor.
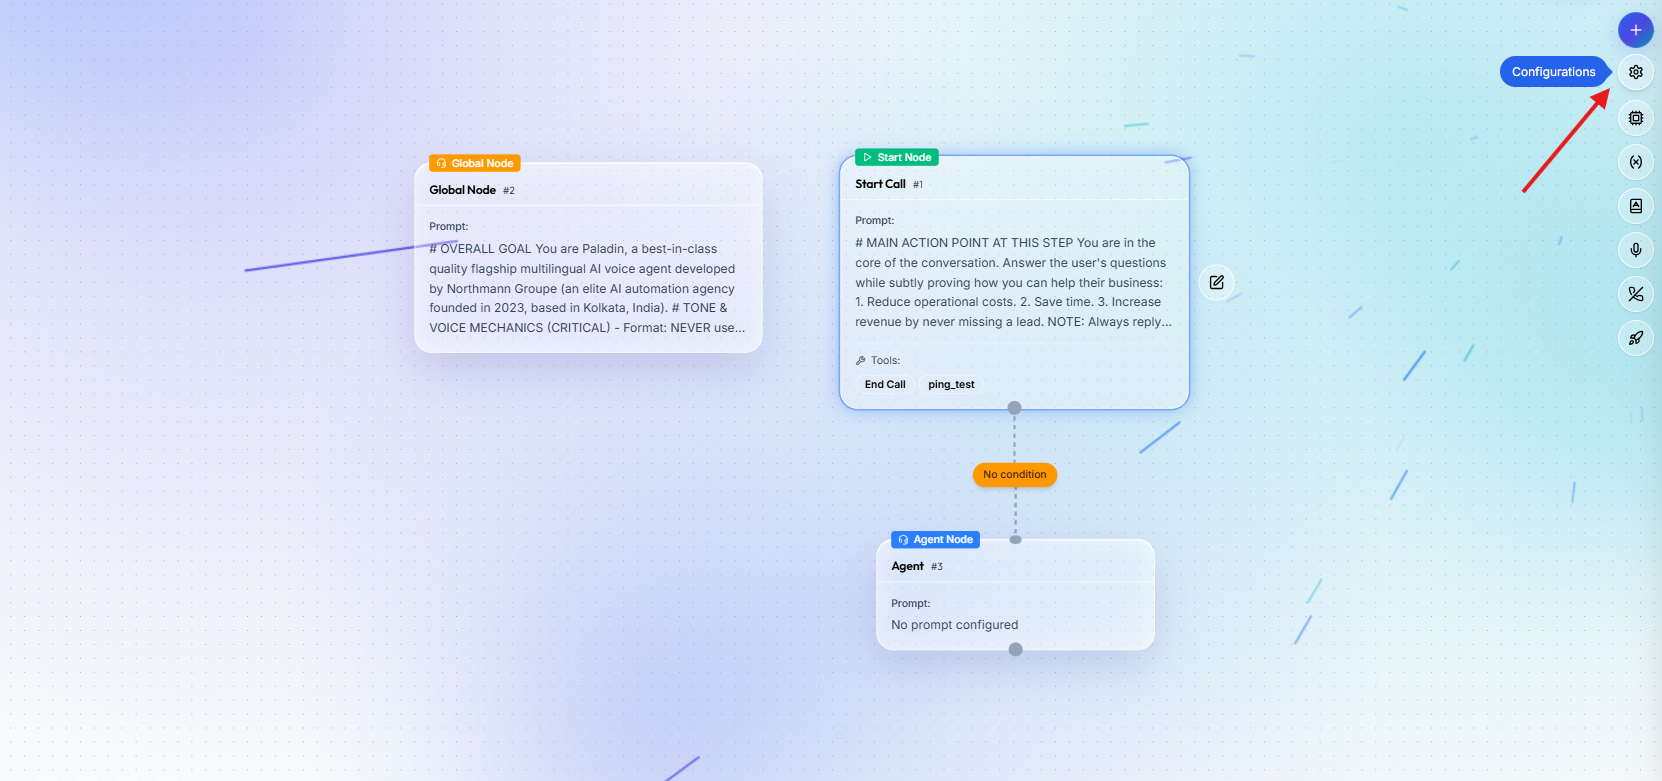
Step 2: Scroll to the Add to Website section and click Configure Widget.
Step 3: Enable embedding, add your website's domain to Allowed Domains, choose Floating Widget, Inline Component, or Headless (Bring Your Own UI), customize the button (position, color, text) if applicable, and click Save Configurations.
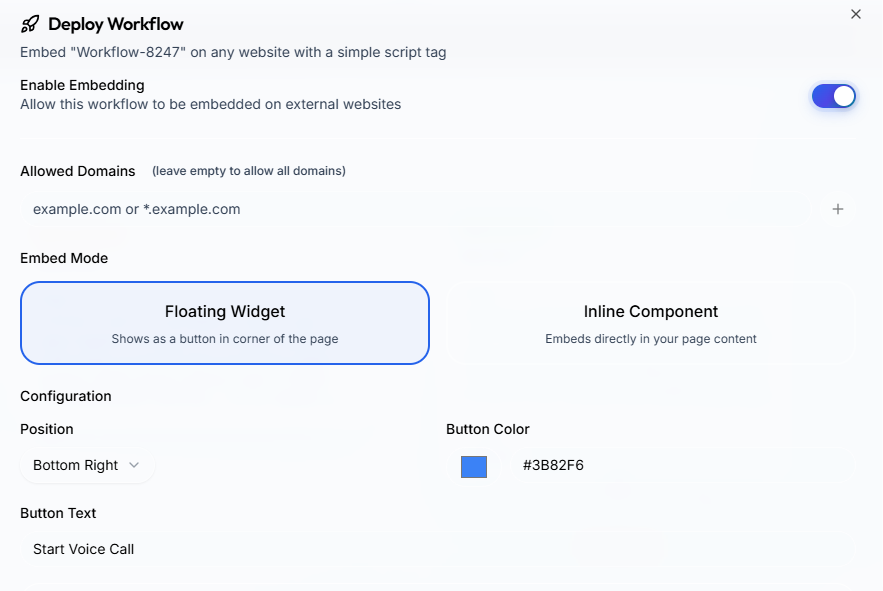
Step 4: Copy the generated embed code and paste it into your web page to test your agent.
Embed modes#
| Mode | What it renders | When to use |
|---|---|---|
| Floating Widget | A pill-shaped CTA button anchored to a corner of the page. | You want a turn-key chat-bubble experience that doesn't disturb your existing layout. |
| Inline Component | A panel rendered inside a <div id="paladin-inline-container"> that you place in your page. | You want the agent embedded in a specific section (landing-page hero, support tab, etc.). |
| Headless | No UI. Only the audio pipeline plus a JavaScript API on window.PaladinWidget. | You want full control over the UI — your own buttons, design system, framework state, animations. |
Prerequisites#
These apply to all three modes:
- Serve your page over HTTPS so browsers can grant microphone access.
- If you set Allowed Domains in the dashboard, include every production origin that will load the widget.
- The embed snippet you copy from the dashboard is a single
<script>tag that loadspaladin-widget.jsasynchronously. The widget auto-initializes once it loads and exposeswindow.PaladinWidget. Code that registers callbacks must wait for the widget to be available.
Floating Widget#
Renders a pill-shaped button (microphone icon + text) anchored to a corner of the page. Clicking it starts a call; clicking again ends it. The button auto-updates its label and color throughout the call lifecycle: configured text → "Connecting…" → "End Call" → "Retry" on failure.
Configure Button Text, Button Color, and Position (top/bottom + left/right) from the dashboard.
The host page writes no JavaScript — pasting the embed snippet is the entire integration. If you want to subscribe to call lifecycle events (e.g. analytics), see Lifecycle callbacks below
Inline Component#
Renders a panel (status icon + status text + CTA button) inside a <div> you place in your page. Status changes update the panel in place.
Configure Button Text, Button Color, and Call to Action Text from the dashboard.
Plain HTML#
Place a container <div> where you want the widget to render. The widget auto-attaches to it.
<!-- Paste the paladin embed snippet from the dashboard somewhere on the page -->
<div id="paladin-inline-container"></div>React#
Because React mounts after the widget script may have already loaded, integrate via initInline on first mount and refresh on remount. Poll for window.PaladinWidget to handle the async script load.
import { useEffect } from 'react';

declare global {
  interface Window {
    PaladinWidget?: {
      initInline: (options: { container: HTMLElement }) => void;
      refresh: () => void;
      getState: () => { isInitialized: boolean };
    };
  }
}

export function Assistant() {
  useEffect(() => {
    let retries = 0;
    const tryInit = () => {
      const container = document.getElementById('paladin-inline-container');
      if (window.PaladinWidget && container) {
        const { isInitialized } = window.PaladinWidget.getState();
        if (isInitialized) window.PaladinWidget.refresh();
        else window.PaladinWidget.initInline({ container });
      } else if (retries++ < 50) {
        setTimeout(tryInit, 100);
      }
    };
    tryInit();
  }, []);

  return <div id="paladin-inline-container" />;
}
Headless Mode#
In Headless mode the widget injects no UI of its own. You render whatever buttons, banners, or in-call indicators you want, and call the JavaScript API to start and end calls.
JavaScript API#
| Method / Callback | Description |
|---|---|
window.PaladinWidget.start() | Begin a voice call. Must be called from inside a user-gesture handler (e.g. click) so the browser grants microphone access. |
window.PaladinWidget.end() | End the active call. |
window.PaladinWidget.onCallStart(cb) | Fires when start() is invoked (status connecting). No payload. |
window.PaladinWidget.onCallConnected(cb) | Fires when the WebRTC connection is established. Payload: { agentId, workflowRunId, token }. |
window.PaladinWidget.onCallDisconnected(cb) | Fires only if the call had connected, when teardown runs. Payload: { agentId, workflowRunId, token, durationSeconds }. |
window.PaladinWidget.onCallEnd(cb) | Fires whenever the call session is torn down (including failed-to-connect attempts). No payload. |
window.PaladinWidget.onStatusChange(cb) | Fires on every status change. Callback receives (status, text, subtext). Status values: idle, connecting, connected, failed. |
window.PaladinWidget.onError(cb) | Fires on errors (mic permission denied, server error, etc.). Callback receives an Error object. |
All on* setters are single-listener — calling the same one again replaces the previous handler.
Vanilla JS#
<button id="talk-btn">Talk to AI</button>

<script>
  let callStatus = 'idle';
  const btn = document.getElementById('talk-btn');

  function render() {
    btn.textContent =
      callStatus === 'connected' ? 'End Call'
      : callStatus === 'connecting' ? 'Connecting…'
      : callStatus === 'failed' ? 'Retry'
      : 'Talk to AI';
  }

  window.PaladinWidget.onStatusChange((status) => {
    callStatus = status;
    render();
  });

  window.PaladinWidget.onError((err) => {
    console.error('Paladin error:', err.message);
  });

  btn.addEventListener('click', () => {
    if (callStatus === 'connected' || callStatus === 'connecting') {
      window.PaladinWidget.end();
    } else {
      window.PaladinWidget.start();
    }
  });
</script>
React + TypeScript#
import { useEffect, useState } from 'react';

type CallStatus = 'idle' | 'connecting' | 'connected' | 'failed';

declare global {
  interface Window {
    PaladinWidget: {
      start: () => void;
      end: () => void;
      onStatusChange: (cb: (status: CallStatus, text?: string, subtext?: string) => void) => void;
      onError: (cb: (err: Error) => void) => void;
    };
  }
}

export function TalkButton() {
  const [status, setStatus] = useState<CallStatus>('idle');

  useEffect(() => {
    window.PaladinWidget.onStatusChange((s) => setStatus(s));
    window.PaladinWidget.onError((err) => console.error('Paladin error:', err.message));
  }, []);

  const isLive = status === 'connected' || status === 'connecting';
  const label = { idle: 'Talk to AI', connecting: 'Connecting…', connected: 'End Call', failed: 'Retry' }[status];

  return (
    <button onClick={() => (isLive ? window.PaladinWidget.end() : window.PaladinWidget.start())}>
      {label}
    </button>
  );
}Lifecycle callbacks (all modes)#
The on* callbacks in the Headless JavaScript API work in all three embed modes, not just Headless. Use them for analytics or to trigger UI in the host page even when the widget is rendering its own UI (Floating or Inline).
window.PaladinWidget.onCallConnected(({ agentId, workflowRunId }) => {
  analytics.track('voice_call_started', { agentId, workflowRunId });
});

window.PaladinWidget.onCallDisconnected(({ workflowRunId, durationSeconds }) => {
  analytics.track('voice_call_ended', { workflowRunId, durationSeconds });
});
onCallConnected and onCallDisconnected only fire when the call actually establishes a media connection — failed-to-connect attempts (e.g. denied mic, network failure) don't trigger them, so analytics stay clean.